
A Guide to Integrating Cookie Notices in Your Self-Hosted Ghost Blog

As blog owners, it's important to be transparent about the use of cookies on your blog and provide visitors with control and overview over their chosen privacy preferences. One effective way to achieve this is by integrating a cookie notices into your hosted webpage. In this article, we'll explore the steps to implement a cookie notice and integrate it into your self-hosted Ghost blog in order to empower your visitors to manage their cookie preferences.
Disclaimer

It is always advisable to consult with privacy policy experts or legal professionals for specific guidance to ensure compliance with applicable laws and regulations. The content provided in this blog is for informational purposes and to the best of my knowledge, and should not be relied upon as a substitute for professional advice.
Integrate or use a Plugin?
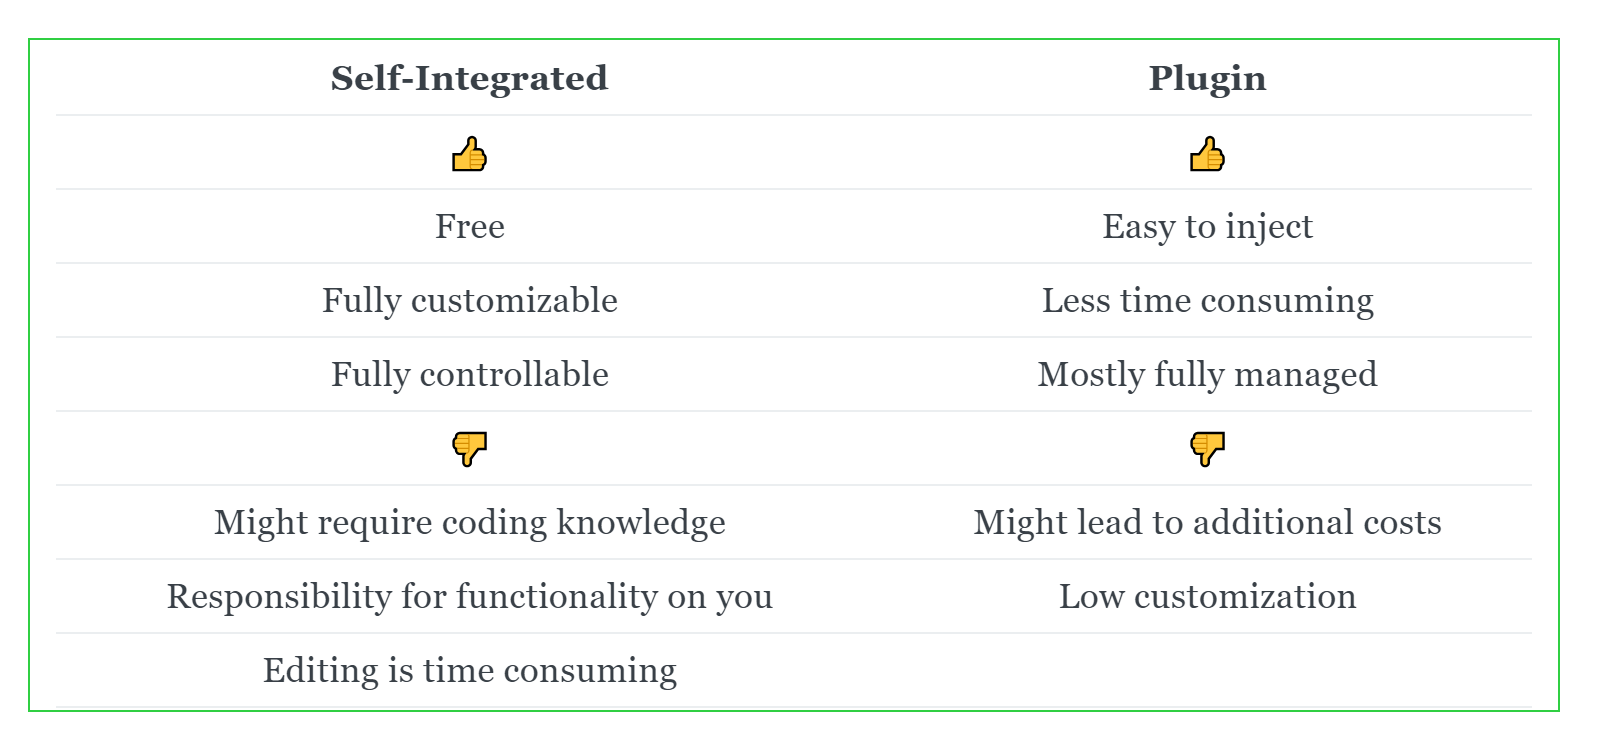
The first question you need to decide for yourself is if you want to extend your Ghost blog yourself (and therefore are somewhat tech-savvy) or if you prefer to simply install/inject a code snippet that does the job for you. There are different pros and cons regarding both approaches and to keep it brief here a short overview.
Implementation
Let's now have a look at how you can integrate a simple cookie notice in your self-hosted ghost blog. The first thing that you need, to achieve this, is a copy of your current themes code. I will assume here for simplicity reasons that you are using an already existing Ghost Theme for your blog, which you would like to extended. If you are extending your custom theme, you can skip to the next section here.
Download theme code
To download your themes code, you need to do the following:
- Go to Settings > Desing in your ghost admin dashboard.

2. Go to Change Theme.

3. In the Themes section, select the Advanced option's dropdown, choose your theme and click on the ... and hit Download.
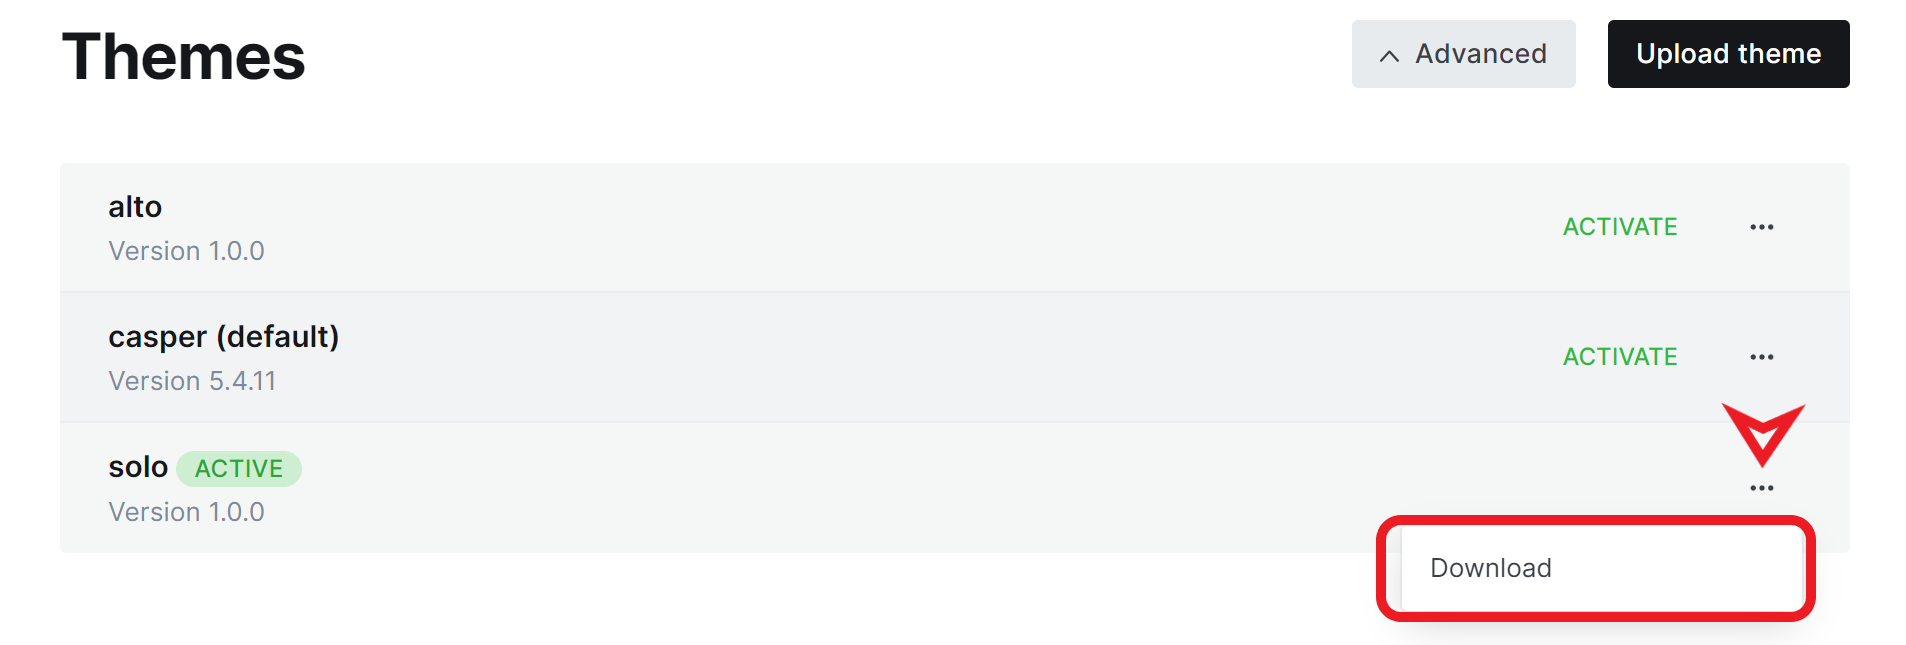
You should now have a zipped copy of your theme's source code.
Layout
In order for your users to be able to manage their cookie preference, we need to provide them with the necessary banner and buttons to do so. In Ghost, there are two levels on which you can add such a banner, blog post level or blog level. To add content that will be valid on the whole blog, look for the file named default.hbs in the source code files you previously downloaded. The following code snippet should be added in the body or in the footer segment of the default.hbs.
<div class="cookie-notice">
  <p>This website uses cookies. <br>
  For more information have a look at the <a href="/privacy">Privacy Policy</a>
  </p>
  <label>
    <input type="checkbox" name="cookie-type" value="necessary" checked>
    Necessary Cookies
  </label>
  <label>
    <input type="checkbox" name="cookie-type" value="statistics">
    Statistics Cookies
  </label>
  <label>
    <input type="checkbox" name="cookie-type" value="marketing">
    Marketing Cookies
  </label>
  <button class="cookie-notice-save">Save Preferences</button>
  <button class="cookie-notice-reject">Reject All</button>
  <button class="cookie-notice-close">Close</button>
</div>
This will add a simple cookie banner featuring a brief description of your web page's cookie policy (which you should adapt depending on your requirements) in the paragraph element <p>. If you already have a privacy policy, you can link it in the hyperlink element, otherwise you should remove this element from the code snippet.
The selecting of the different cookie flavours and the persisting of a user's choice is covered by the buttons and the checkboxes added in the code snippet above.
Styling
To highlight the previously added components (description, checkbox, buttons...) the following CSS styling can be used.
.cookie-notice {
  position: fixed;
  bottom: 0;
  left: 20px;
  right: 20px;
  background: #f5f5f5;
  padding: 10px;
  text-align: center;
  font-size: 14px;
  z-index: 9999;
}
The new styling elements can be added to the assets/css/screen.css file, from your copy of the ghost theme. This will add some clean highlighting to the cookie notice and make it more noticeable from the rest of the web page. The styling itself can (and should) be adapted to match the rest of your page and your branding.
If you need more information on CSS have a look at the well written tutorials from W3schools.
Maintain User Preferences Across Sessions
In order to persist the user's choice, we can use a cookie to store the information across sessions. To do so, we need to modify the following file: assets/js/main.js. This will allow us to add some dynamic methods for storing and retrieving the user's selected cookie preferences on each load of the ghost blog.
The first method needed here is one that takes care of handling the users input on each button defined in the previous section.
function handleCookieNotice() {
  var cookieNotice = document.querySelector(".cookie-notice");
  var saveButton = document.querySelector(".cookie-notice-save");
  var rejectButton = document.querySelector(".cookie-notice-reject");
  var closeButton = document.querySelector(".cookie-notice-close");

  if (cookieNotice && saveButton && rejectButton && closeButton) {
    saveButton.addEventListener("click", saveCookiePreferences);
    rejectButton.addEventListener("click", rejectAllCookies);
    closeButton.addEventListener("click", hideCookieNotice);
  }
}
The function handleCookieNotice initializes and manages a cookie notice banner. It selects the cookie notice element and its associated buttons: save, reject, and close. If all elements are present, it adds click event listeners to these buttons.
function saveCookiePreferences() {
  var selectedCookies = document.querySelectorAll(
    'input[name="cookie-type"]:checked'
  );
  var allowedCookies = Array.from(selectedCookies).map(function (cookie) {
    return cookie.value;
  });

  var expires = new Date();
  expires.setFullYear(expires.getFullYear() + 1);
  document.cookie =
    "cookie_preferences=" +
    allowedCookies.join(",") +
    "; expires=" +
    expires.toUTCString() +
    "; path=/";

  var isMarketingAccepted = allowedCookies.includes("marketing");

  if (isMarketingAccepted) {
    loadGoogleAdSenseScript();
  }

  hideCookieNotice();
}
When the save button is clicked, the saveCookiePreferences function is executed. This function collects the user's cookie preferences from checked inputs, stores these preferences in a cookie, and checks if marketing cookies were accepted. If marketing cookies are accepted, the Google AdSense script is loaded, for example. Finally, the cookie notice is hidden so that the user can then dedicate his attention to the page.
function loadGoogleAdSenseScript() {
  var script = document.createElement("script");
  script.src =
    "https://pagead2.googlesyndication.com/pagead/js/adsbygoogle.js?client=ca-pub-your-adsense-id";
  script.async = true;
  script.crossOrigin = "anonymous";
  document.head.appendChild(script);
}
The loadGoogleAdSenseScript function dynamically loads the Google AdSense script by creating a script element and appending it to the document head.
function rejectAllCookies() {
  var expires = new Date();
  expires.setFullYear(expires.getFullYear() + 1);
  document.cookie =
    "reject_all_cookies=true; expires=" + expires.toUTCString() + "; path=/";

  hideCookieNotice();
}
The rejectAllCookies function handles the rejection of all cookies when the reject button is clicked. It stores a cookie indicating the user's rejection and hides the cookie notice.
function hideCookieNotice() {
  cookieNotice.style.display = "none";
}
The hideCookieNotice function hides the cookie notice element by setting its display style to "none".
document.addEventListener("DOMContentLoaded", function () {
  if (hasRejectedAllCookies()) {
    var cookieNotice = document.querySelector(".cookie-notice");
    if (cookieNotice) {
      cookieNotice.style.display = "none";
    }
  } else if (hasConsentedToCookies()) {
    var cookieNotice = document.querySelector(".cookie-notice");
    if (cookieNotice) {
      cookieNotice.style.display = "none";
    }

    var isMarketingAccepted =
      hasConsentedToCookies() && document.cookie.includes("marketing");

    if (isMarketingAccepted) {
      loadGoogleAdSenseScript();
    }
  } else {
    handleCookieNotice();
  }
});
When the document content is loaded, an event listener checks if the user has rejected or consented to cookies. If cookies are rejected or consented to, the cookie notice is hidden accordingly, and the Google AdSense script is loaded if marketing cookies were accepted. If no decision is found, the handleCookieNotice function is called to display the cookie notice.
function hasConsentedToCookies() {
  var cookies = document.cookie.split(";");
  for (var i = 0; i < cookies.length; i++) {
    var cookie = cookies[i].trim();
    if (cookie.startsWith("cookie_preferences=")) {
      var cookieValue = cookie.substring("cookie_preferences=".length);
      return cookieValue !== "";
    }
  }
  return false;
}
The hasConsentedToCookies function checks if the user has consented to cookies by searching for a specific cookie that stores cookie preferences.
function hasRejectedAllCookies() {
  var cookies = document.cookie.split(";");
  for (var i = 0; i < cookies.length; i++) {
    var cookie = cookies[i].trim();
    if (cookie.startsWith("reject_all_cookies=")) {
      return cookie.substring("reject_all_cookies=".length) === "true";
    }
  }
  return false;
}
The hasRejectedAllCookies function checks if the user has rejected all cookies by searching for a specific cookie indicating the rejection.
This will handle all the user's interaction with your cookie banner in a dynamic way.
Uploading the changes
In order to upload the changes, you can in general follow your theme's specification. This will indicate the necessary dev tools to build a new version to re-upload on your ghost instance.
In the case of the solo theme used in this example, it uses yarn to build and package the whole theme. To have an up-loadable zip archive, in this case one can run:
yarn zip
Which will package the theme into the dist/solo.zip file. This can then be uploaded to the ghost blog similarly as described here, and voilà. Your brand-new cookie banner is done.
Conclusion
By integrating a cookie notice into your self-hosted Ghost blog, you can demonstrate your commitment to user privacy and comply with relevant regulations. Following the steps outlined in this article, you can implement a cookie notice that informs visitors about the use of cookies, provides options for consent and preference customization, and respects user choices throughout their browsing experience. Enhancing transparency and user control will contribute to building trust with your audience and maintaining a privacy-conscious website.